Showing posts with label designer shoes. Show all posts

Mar 7, 2014

Footwear Design course- Registration Is Now Open!


As promised at the beginning of this week I just opened registration for my intensive online design course.

Footwear Design Course: "Knowledge -Technique – Freedom"
It is a practical intensive design course, it is an workshop to gain you the knowledge and advantages you need to create shoes that you want to create, if it's for you or for your client.
As I mentioned in a previous post , this course will be more about doing then talking. Without any expectation for your inspiration, ideas or any other excuses. Here you will come up with your own shoe designs working through your knowledge in footwear construction that you will gain during this course.
I simplified the process and understanding of shoe construction, so it will suit for beginners in footwear design as well as for more experienced designers and shoemakers.

This course consists of 9 lessons with duration of 45-60 minutes, 2 lessons a week. The cost of the course is 120 Euros.

The course will open in 25 March The course will launch on March 25th.

The course price:

Early bird registration : Until March 15 = 100 €

Members early birds: = ( Use your discount code) 55 €


Regular price : 120 €

Members: = 70 €

Here are short summary of the Footwear Design Course:"Knowledge -Technique – Freedom"


Introduction : Understanding footwear design or what is it mean being footwear designer.
Footwear design or Footwear styling
Footwear as complete product
Don't wait for inspirations- Use your technique knowledge
Technical knowledge as a key for creativity
Shoe world guide
Simplify the rules of pattern construction:
Workshop: 6 types of shoes
Learning the rules
Construction on the last
How knowing the rules of construction will help you to create any design
10 crucial points on your last to avoid mistakes in your design
Freehand Pattern Technique- How to simplify the most complicated shoe patterns. This technique will allow you to explore your creativity by giving you the right tools and freedom in design.
Shoemaking rules and freehand pattern workarounds

Intensive workshop:


Click the link for full list

The course will be hosted at Shoemaking Courses Online.

For questions you can contact me : Here


Kind regards,

Sveta Kletina


Follow my blog with Bloglovin

Jun 18, 2013

Here is a Method That is Helping Shoemakers to Make Correct Patterns


You familiar with this situation, when you do something and just cannot complete it because of constantly emerging desire to supplement and improve. My book now at the last editing stage, and will appear on the blog in a few days. Due to the delay, in this and next posts that will come out this week I want to show you a few snippets of it, to somehow compensate you for your wait. Each tutorial - is a small excerpt from the whole and vast parts of my book. Today, using pumps shoes as an example, I want to show and explain, an absolutely important knowledge in pattern making and shoe design, using critical points to make correct shoe pattern.
 You want the shoes sat well on the foot from the first time? No loose ends on the sides! No falling out fingers on the sandals! No too high or too low  topline in
 throat area! No irritating bubbles on the leather!  No, too tight shoes

Jun 10, 2013

Design Concept: Collect, Research & Develop


How long it have been? 2 months ? I know, I know I have a lot of explaining to do and I will, but first let me just say it's good to be back, how strange it may sound it's even exciting to type this post on my keyboard, a definite change for me in this couple of months.
I thank you all who emailed me, concerning my sudden disappearing, it's a great and warm feeling to know you care and it surely gave me a lot of strength to keep up with what I was doing. The reason for my disappearing is pretty simple, work a lot of work. I can't say it was not expected, I was willing to take orders and make this collection in a bigger scale but I was not ready for this and you know you are not ready, when there is just not enough hours in a day (and night). There is a bigger story to tell what and how it happened, but I learn my lesson and I even developed new and exciting techniques to help me work faster and more efficient and I didn't forget you. So, remember the book? Design book that I was writing about, just before all this? Well, I made a few serious changes and even added more  great content for your creative minds, like the points you have know  to create correct pattern from the first time.
The book is planned to be available here on my blog on June 15, so I will keep you posted.

Mar 12, 2013

Why is it important to know how to make the classic model of shoes?


When I studied at the Art Academy in Jerusalem, I was very fond of classical drawing lessons, because I understood that in the future  for  me to be able to draw any of  my fantasy figure, I must first learn the basics. So, in whatever  you touch upon, in any field, you must first learn the basics of the subject, in which you would like to achieve perfection. At the shoe craftsmanship such a basis, in my opinion, is the study of all the classic shoe models based on which you can make any shoe.

So to be a designer that is not only "creates" and by that I mean "makes a pretty drawing on a paper", but also can really make any of his ideas, it is important to know the construction of the classic shoe models. While I personally have never made any classic model of shoes (in a his "clean definition") in my own collections
, I have all my models designed only because my knowledge on how to structure classic models of shoes. Those  models as they are, in terms of design, don't interest me, but the knowledge of their design gives me the freedom to create. They, like the alphabet, for those who wish to be a writer.


Feb 5, 2013

How to make Penny Loafer shoes with tassels


1) As usual paste the adhesive tape on the last and draw your Penny Loafers with tassels on the same principle as we did with  loafers  in the book(Penny Loafers Full Guide). Only at the point D (reference to the book) from the tongue to the sideline make round transition. Tassels and leather laces visually must continue this transition.

Feb 2, 2013

How to make shoe pattern with folds


It is example for basing sandal with folds


 I want to show you how to make this kind of pattern. This is one of the existing methods.


Basic model
1) Tape adhesive tape on the shoe last , draw a sandal , cut and paste the  adhesive tape pattern on a piece of cardboard. Reference to the first 2 points in the previous post about the T Strap Sandals.


Jan 9, 2013

Learn to Make an Insole Pattern and New Full Guide for Penny Loafer Shoes


After the holidays, as always, there is a lot of unfinished business. I'm working on one shoe last, well checking if it's right, and then basing on this last I want to build another one. That is by the way what I do, I construct all my last.

 Lack of normal production of shoe lasts in Israel (as well as all other services of the footwear industry) leaves me no choice as to construct it by myself, to achieve the desired result. Just between us, to be honest, through trial and error, I learned how to make shoe lasts. But as much as difficult as it might be, it gave me the freedom to make any type of shoes that my imagination creates and that is all I want.
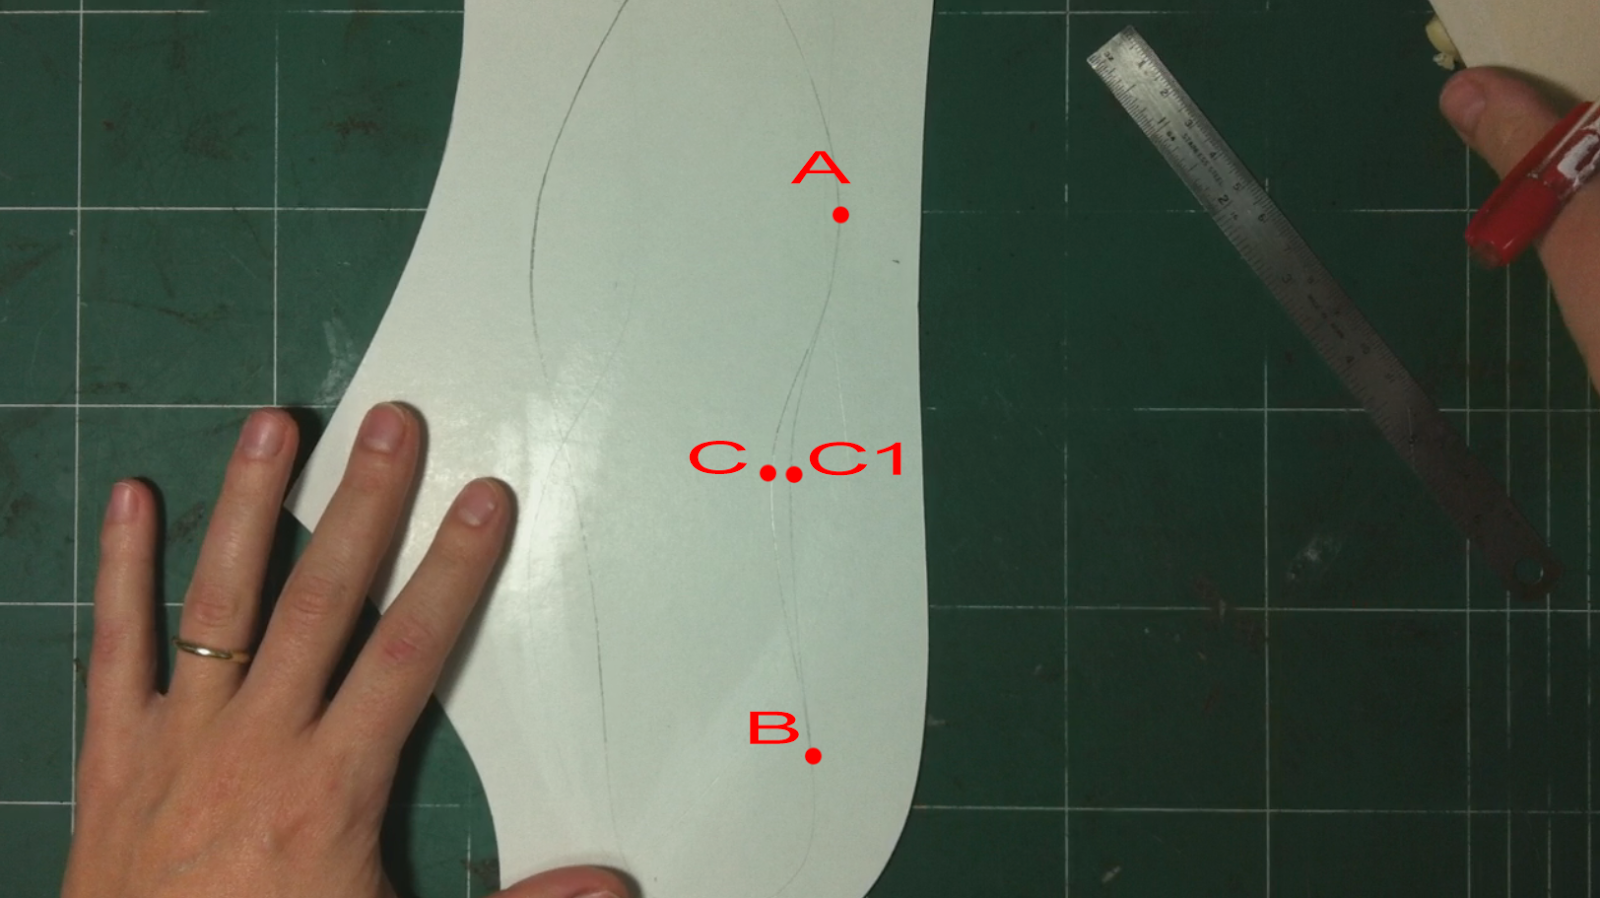
So at the same time I decided to show you how I make inside, solid insole pattern. It is based on the midsole pattern (link to video), but we need to add a small change to it:


1) On the inner side from point A to point B through C1 draw a smooth line. 


Nov 22, 2012

Single cut pattern for high heel pumps


Boat shoes model, in spite of its apparent simplicity is one of the complex shoes to make. The complexity is in precise of lines that are to be performed. It is in the crew neck, in the so-called cleavage, concentrated all the beauty of the shoes, which should emphasize the graceful curve of the foot. 


Therefore, in the construction of boats all the focus on finding beautiful deep cut on the last
. When I was in Italy, I took a course conducted by boots pattern teacher, who was nicknamed the King of boats. His name was Bruno. He was already retired, but he was still invited to all the shoe factories in the area where I went to school, to make pattern of a boat for them. This wonderful teacher showed us an interesting method for constructing single cut pattern pumps with high heels. It is quite difficult to do and requires a lot of experience. I want to show and explain to you the key point of this method. How from basic pattern, requiring dividing boat patterns on two parts (the seam on the inside of the boat), to make a single cut basic pattern.

Step by step guide "Single cut pattern  for high heel pumps"

Oct 24, 2012

Best Effective Method in Shoe Making and Maria Mastori Jewelry


I have said many times that I wanted to make shoes as master shoemakers of the past, but that does not mean that I blindly follow the traditions of shoe making  on the contrary, sometimes I break them. I like to find a shorter and easier way to achieve the result, even if it is not accepted in the footwear techniques, because I always have effective approach for solving the problem, whether it be technical or stylistic.

 Effective means the best for me, for shoe design. If shoes are difficult to sew, that is, its execution takes a lot of time, but that is the way I see it this constructed, for me it effectively to sew how long it will take. Therefore, no matter what, I will always find effective, in my understanding, methods. For example, very often, when I want to quickly check something and I do not have a suitable insoles for shoes, I'm doing it out of the one I have at the moment. 
Maybe this is not quite correct way to make an insole, but it very quickly done and I don't have to wait till the next day to go and order it on the factory. So for me it is effective at that moment, means it is right. For those who are faced with a lack of appropriate insoles in the process, this is little tutorial that will fix the problem.


Oct 9, 2012

The Secret of Correcting pattern shoes by Trippen


Today, luckily I met a friend, shoes designer, he is old school and, of course, I pop the question. I could not get  the exact springing of vamps in the pattern for  men boots. And when I saw him in the parking lot, I asked how to? what am I doing wrong? He explained it to me, while leaning casually on a car, drawing on a piece of paper. I just had to move a point not on the top center of the line, just on the bottom line. Her is the video on how to do it right.


He gave a few more tips, which I will soon share on my YouTube's  channel:

Behind the scenes of shooting


Oct 5, 2012

My Secret Skeletons & bridges shoes project and incredible designer Koji Horigome


Enter your email address:


  My  Secret Skeletons & bridges shoes project and incredible designer Koji Horigome


Slow and steady wins the race. It's about me, in the sense that the slower I do things, I'm  moving  far away from the goal. According to the plan I had already done the following model from my project "skeletons and bridges." But I only now started to create it. Thank God that I made the pattern pretty quickly. 


Oct 2, 2012

My first online eBook and Tracey Neuls amazing shoe lasts


Enter your email address:


My first online eBook and Tracey Neuls amazing shoe lasts


Finally I made my first eBook. Initially, It took me a lot of time to decide go for it and find the time for it, especially because I wanted to include a video too. Because I wanted it to be a very detailed and understandable guide. to show how to make a quick and accurate pattern for pumps with a heel of 5 cm idea to create it. My husband gave me the idea , Because he saw that people are interested and consult with me through my YouTube's channel. Thanks to this guide I have had ideas to write other tutorial books that I'm going to do, when I'll find the time in my busy schedule. This book is available for free at my new web site www.sk-shoes.com .


Bordo Shoes


Then came the fall to Israel,  if it can be called that, "there is a little breeze", which replaced the unbearable heat Therefore, I was able to show off my new shoes, which I made for myself for the fall collection. This model called "Bordo" it  is from my new collection.


 Designer talk


Today I want to talk about one designer shoes, which I love and which I discovered to my shame recently. This is a designer from London, I'm absolutely sure that everybody on the planet, except me  know her and her name is Tracey Neuls. She has two lines of shoes, one called by her name, another 29TN. Her shoes are always very concise, and at first glance it may seem simple. But this simplicity is, in my opinion, simply brilliant. She always finds a very interesting solution in design, joining upper with sole and heel. For example, just by painting toecap and heel, covering the sole and heel.


Source: flickr.com via Svetlana on Pinterest

 It's so simple and beautiful. She also has wonderfully beautiful heels that are an integral part of all shoes and almost major structural ornament of her shoes. Heels resemble historic 18th century, but more
delicate and are very skillful addition of uppers on the inside of the heel, or on the top of it. In this way emphasizes the plasticity of fine heel shoes and the whole shoes becomes a rounded appearance. It itself is a work of art.


But that's not all. I also like Tracy shoe lasts. They are an interesting shape and seems to be a  lot of comfort. The first time I saw her shoes, the shape of shoes reminded me of the museum's 19th-century shoes, which took the form of its owner feet. That is, Tracey Neuls shoe lasts has a form used shoes, only a very stylistically overdone and skillfully shaped the design of the shoe upper.


I find it very interesting and new, and probably that's why shoes look not only beautiful, but comfortable . She is also experimenting a lot with materials and the leather, adding a custom materials to shoes.


Have a nice week and see you soon!


In this post I talk about:


1. My first e-book
2. My husband gave me the idea
2. Making a video tutorial.
3. New pic from my fall collection.
4. Designer talk with Tracey Neuls 


Items mentioned in this post:


Sep 24, 2012

Sketches


Enter your email address:


                                   Sketches

First, my daughter got sick, what can you do, children garden is a pool of diseases , and after her I got sick. But, as they say, every cloud has a silver lining, I got a free week and I was able to work on the project. I draw and sketch, lying in bed, and then noticed that in all sketches, figures constantly present a decorating element that does not carry any function other than decoration. I wondered why I draw this, I do not like just decorative elements. I love it when they are an integral part of the whole pattern. That's why I drew so much and could not understand why they do not impress me. It was just pretty  pictures, but without any thought, empty. They did not inspired me, I just did not want to do them. So I stopped for a moment, trying to remember my original idea. I had to emphasize the natural flexibility of leather and maximal use those characteristic  in my shoe. In my last collection, where the hidden interior of the shoe, which is never seen, I put it all out. My bespoke shoes. This, in fact, the most important structural parts of footwear, made of thick leather. I had enough of the kind of glimmer and at the same time, rough skin, for me to make a simple cut, no tricks are necessary, it walks the walk. In the sole, I use the natural properties of the leather to give the flexibility for the total construction of the shoes. Therefore, wishing to create a closed shoes with no cords, I had to do something that emphasize the importance, flexibility of the sole, and at the same time was decorative element, shoes should be not only comfortable, but also beautiful.
Finally, I drew a sketch, and I liked it.


 Here, the top pattern is designed as a flexible lock attached to a pole-arc on the sole. Thus used the flexibility of the leather in the sole with a specially designed structure of the sole. This is what I was looking for. I hope that my calculations are correct, and I'll get exactly what I planned. I will discover this soon. I do not know if I can make this shoe for the next post but I'll try. Please subscribe to my Email list to get updates.
Thank you for reading.

 You can find more information about me at :

Sep 13, 2012

Bridge&skeleton shoe project. Slow but confident


Enter your email address:


Bridge&skeleton shoe project. Slow but confident     


In my spare time, in my "leisure time", I do not read, I don't  walk, I do not watch TV, Ii continues my work on a project where I was experimenting with the possibilities of the leather in shoe design.
Time passes quickly, I can feel it in a  physical way. Anything that  I put off for tomorrow, at best, will be done next week. That is why my project is moving so slowly. But recently, my daughter start going to kinder garden , I finally decided on this and I get a little more time, so I made another sandal in the "skeletons" series.  I called it "a bridge", as originally  I was inspired  to create them thanks to  Santiago Calatrava bridges. Sandals are constructed from the shoe sole and sliding to the upper of the shoe .It is the basis for the rubber cords that wrapped around the leg. 


For a more complete understanding once again here is my first model of sandals. 


Thinking about the future development of the idea, where the sole -is the basic, or even, the main element of the design, I can see only the images and the shape of those shoes. Its exact design I'll get when I start working with the sole, and has its form and function dictate to me the whole design of the shoe.
This is like working with the fabric on a mannequin, soft tissue, structure and flexibility dictate fashion designer the look of the dress. This  is the magic of the creation, for me, when you merge with the idea and only it directs you. At that moment ,there is no ambition, no selfishness, no vain pursuit of commercial success. So I just love working on non commercial projects, where I don't lead by the thought of the sale, but only the desire to recreate the right idea, like a fire burning inside of me. I'll finish this post with a  trite phrase, but a correct one.
Don't  put off for tomorrow what you can do today.

Jun 6, 2012

How to make a sandal


Enter your email address:


How to make a sandal

I have not written posts and totally abandoned my blog. Perhaps those who read it before, had lost all interest in him. Anyway, I decided to continue my blog and my first post after a long inexcusable break, I dedicate to my video tutorial, where I show how you can make a sandal without special equipment, without shoe last, all by yourself. It was my dream for long time to develop this simple technique, that will allow anyone to make a sandal for themselves without living the house. I want to show you how to do this with so-called "biblical" sandal as the example, and you already can vary based on it. In this post (after you watched the video- both parts),I want to draw attention on a few important moments.

 Here is the list of things you need  to get it done.

- A4 paper
- duplex cardboard
- pencil
- eraser
-colored markers
-Stanley knife
-masking paper -punch -leather glue
-ruler
- punch
-buckle 2 cm wide
-abrasive paper
-drill
-scotch tape
-hammer
-leather for the upper& leather for insoles and soles -pin
-spoon (yes, a spoon)

Notes to the first part

1. The front of the sandal can be done in any shape: oval, square, pointed, asymmetric, etc. 2. You can use your old sandal to shape the insole . 3. Width of the straps should be the same as the width of the buckle. In my case it is 2 cm. 4. When attaching the straps, the inside (of your foot) strap should be put closer to the base of the thumb and the outer strap to your pinky. 5. Be sure to mark the inner side of each strap.

Notes to the second part

1. Marks on the inside and outside of the insole shall follow the same line, except for the front marks. 2. Add 1.5 cm to each strap (This will be the part which should be glued to the insole). Be sure to cut the mark out in order to identify their position. And then mark it on the leather. 3. The holes for the buckle should be with an interval of 7 mm-1cm. 4. To get a better and straight cut of the leather straps, tape the cardboard straps to the leather using the scotch tape. 5. You don't have to drill the insole for the straps, but it will be easier to glue the insole to the sole in the end. 6.When you put the second layer of glue on the insole and the sole, it should be left to dry for 24 hours. 7. The heel can be in any shape: oval, round, asymmetrical, square (like in my video). For those who size 37, the length should not be above 8.5 cm. 8. Important: It's better to glue the heel to the sole before gluing sole to the insole. 9. You can attach a rubber heel-piece, to prevent the heel grinding. 12. When polishing shoes and insole edges, wet it with water and grind in one direction to obtain a smooth surface. That's it for this post, feel free to write and comment if you got any question. If you got your sandal done, send me the picture, I would love to post it on my blog.
 I'll be back next week with new stuff, stay tuned. 
Sveta Kletina
Find me on Facebook
Follow me on Twitter 
My website :www.sk-shoes.com
Web Statistics