Showing posts with label blog post. Show all posts

Mar 7, 2014

Footwear Design course- Registration Is Now Open!


As promised at the beginning of this week I just opened registration for my intensive online design course.

Footwear Design Course: "Knowledge -Technique – Freedom"
It is a practical intensive design course, it is an workshop to gain you the knowledge and advantages you need to create shoes that you want to create, if it's for you or for your client.
As I mentioned in a previous post , this course will be more about doing then talking. Without any expectation for your inspiration, ideas or any other excuses. Here you will come up with your own shoe designs working through your knowledge in footwear construction that you will gain during this course.
I simplified the process and understanding of shoe construction, so it will suit for beginners in footwear design as well as for more experienced designers and shoemakers.

This course consists of 9 lessons with duration of 45-60 minutes, 2 lessons a week. The cost of the course is 120 Euros.

The course will open in 25 March The course will launch on March 25th.

The course price:

Early bird registration : Until March 15 = 100 €

Members early birds: = ( Use your discount code) 55 €


Regular price : 120 €

Members: = 70 €

Here are short summary of the Footwear Design Course:"Knowledge -Technique – Freedom"


Introduction : Understanding footwear design or what is it mean being footwear designer.
Footwear design or Footwear styling
Footwear as complete product
Don't wait for inspirations- Use your technique knowledge
Technical knowledge as a key for creativity
Shoe world guide
Simplify the rules of pattern construction:
Workshop: 6 types of shoes
Learning the rules
Construction on the last
How knowing the rules of construction will help you to create any design
10 crucial points on your last to avoid mistakes in your design
Freehand Pattern Technique- How to simplify the most complicated shoe patterns. This technique will allow you to explore your creativity by giving you the right tools and freedom in design.
Shoemaking rules and freehand pattern workarounds

Intensive workshop:


Click the link for full list

The course will be hosted at Shoemaking Courses Online.

For questions you can contact me : Here


Kind regards,

Sveta Kletina


Follow my blog with Bloglovin

Jan 1, 2014

6 Best Value Shoe Pattern Making Tips for 2014 that I Use Every day


Happy New Year Everybody! As I waked up early today after new year's celebrations I wanted to launch this year with very optimistic, happy start blog post to benefit all of my readers, In this post I will give away 6 best value Pattern Making Tips that I use in every shoe model that I do, and it helps me to avoid mistakes and saves my time like nothing else. But before we get to that, I want to take a minute to thank you all for the past year.

A lot happened in 2013 with this blog and this community, we definitely got bigger which is amazing in my opinion and what is more amazing and what I am personally thankful for is the support I get from you. I launched Shoemaking courses online 3 month ago, with no expectations what so ever and to see so many people joining the courses was just amazing, thank you all and I promise to keep the content in the highest level and help your growth and creativity.

Nov 30, 2013

Black Friday Sale and Making Heel Cover Tutorial

My current work schedule feels like one long working day, balancing between making my own shoe orders, shoemaking courses and freelance collaborations takes time, so each day I am thankful that I do what I love, because there is no way I would be able or willing to do anything else. This post was a long coming and I have a lot  to share with you .

I am very proud to announce that, last week " VIRTUAL SHOE MUSEUM" posted a blog post about  "shoemaking courses online" . Very detailed, great post , and it was kind of a weird for me , in a good sense, as a longtime follower of this website to be on it. Not just with my shoes, that  were listed on this website recently as well, but with what I do with this blog and with Shoemaking courses online, something that I am very proud of, something that I invested all of myself and I believe makes a change.  Thanks to that post, since last week, shoemaking courses online getting a massive flow of new members and interest of fashion bloggers, who discover this website for the first time, and that is just great. Big thank you to Liza Snouk, who runs "Virtual Shoe Museum".
 You welcome to read the post in the link below.
My YouTube channel consist more then 40 tutorials and it's easy to get lost, specially with a new YouTube layout. Although I already published a post to help you find my old tutorials on making shoes and you can find it here " Here is a Post That Will Help You Find my Older Tutorials" I still have been asked to show tips and tricks that I already did, so here is the link again.
Recently I was asked by a member to show how to make a pattern and actually to create heel cover from leather. My answer to him was, that I already did, in  " How To Make Rihanna 2012 X Factor Shoes by Yourself " but he couldn't find it, and when he did, said it was too fast for him and he is use to normal speed tutorials that I have on the platform and why there is no voice over, just music.
 It made me think on all of the changes that happened since I started this blog and maybe there is a problem, specially with my long tutorials that I made and I defiantly need to take care of it. So here you go, a short ( 20 min) tutorial on "How to Make a leather cover for a heel".  It's in a normal speed, but there is no me talking like on my courses, maybe next time.


Jul 9, 2013

Day 2: How to adopt your design to Golden points by bending some rules?


Knowing the gold points is surely makes your life as designer or shoemaker much easier but knowing them, memorizing them will not solve your problem unless you making the same boot over and over again. You must know how to use this knowledge, to create your own formulas, because each design that you may have will extend the possibilities that those points gives you, and you need to know how to fix it. One thing for sure, it comes with experience and creative approach, not to mention other aspects that are influence your design, like type and correctness of the last you use, type of leather, it could be too thick, to stretched, no stretched the best advice I can give you is, learn it, use it, make it your own.

Here are couple questions and answers that emerged from the book:

  •  How to stay in the safe area (golden points) but exceed the classic last borders. (from chapter 2 , 4)

Visually divide the last into equal segments, so you will be able to work in the last proportions:

For example: Let's say I want to make asymmetric Channel shoes with geometric forms in the pattern. To do it I visually divided the last into 4 even segments, that are created by lines LM,KK1 ( middle of the last length), FC.

By creating volume in the heel( 2 segments- LM, KK1) I need to make this volume equal in other two segments KK1, CF according to the geometric forms of the pattern.


As you see, by doing this I work according to the rules of Golden points and I divide the last into proportional segments that are helping me to extend the boundaries of the last and in the same time staying in the last proportions. That's what I call bending the rules.

  •  Selectively chose the gold points that you need to work with your design 

Jun 23, 2013

Shoemaking with Freehand Pattern Construction Technique


Today we going up a notch,  and I want  introduce you to my "FREEHAND PATTERN CONSTRUCTION TECHNIQUE"  that I developed . I work with this technique and for a very long time , this is the only way I design and construct my patterns, do to one important reason, I can build almost any design that I desire with this technique. Try to think about this technique as you just purchased  a 3D printer and this machine can make your wildest designs.  
 It will be an almost impossible to explain all the technique in this post, but I just wanted to open your mind to the possibilities, because I sincerely use it in my work . In my opinion this is the best approach to shoe design, because it gives me much more possibilities in making creative patterns for shoes.   It promotes an understanding of the shoes as a whole object, which is based on engineering laws, and does not consist of separate parts, as in decorative  design .

I describe the design through pattern more particular in my book and how I use this method to make more creative designs. Here is a short tutorial that is just a little taste of what you can do with "FREEHAND PATTERN CONSTRUCTION TECHNIQUE". In this tutorial I will show you how I transform pump shoes into half pumps- half boots.


Have a nice week!


If this post was useful for you and you think you can integrate it in to your work, share this post to fallow shoemaker and post comment bellow.


Jun 10, 2013

Design Concept: Collect, Research & Develop


How long it have been? 2 months ? I know, I know I have a lot of explaining to do and I will, but first let me just say it's good to be back, how strange it may sound it's even exciting to type this post on my keyboard, a definite change for me in this couple of months.
I thank you all who emailed me, concerning my sudden disappearing, it's a great and warm feeling to know you care and it surely gave me a lot of strength to keep up with what I was doing. The reason for my disappearing is pretty simple, work a lot of work. I can't say it was not expected, I was willing to take orders and make this collection in a bigger scale but I was not ready for this and you know you are not ready, when there is just not enough hours in a day (and night). There is a bigger story to tell what and how it happened, but I learn my lesson and I even developed new and exciting techniques to help me work faster and more efficient and I didn't forget you. So, remember the book? Design book that I was writing about, just before all this? Well, I made a few serious changes and even added more  great content for your creative minds, like the points you have know  to create correct pattern from the first time.
The book is planned to be available here on my blog on June 15, so I will keep you posted.

Apr 12, 2013

Here is a Post That Will Help You Find my Older Tutorials


As the week passed by so fast, and I'm still in a middle of editing my book and some of my new tutorials, which will come out real soon, in a matter of days, and I'm actually very excited about that. I didn't had the chance to create any new tutorials to upload this week, but I did wanted to reuse my older posts and to be precise,  my older video tutorials and the reason for that is that each week I get an email from someone asking me to make some tutorial and most of the time it's something that I already did. So I thought, it's probably not that easy to find them on my Youtube channel, and I should make some order for my readers and this post will be all about old tutorials and not so old tutorials.

Midsole/ Insole How Do You Do It


Apr 2, 2013

Creative Pattern Making As a Key For Wining Design


This post is all about my new book that is coming out by the end of next week, which I'm very excited about. I'm very confident and thrilled about this one, because it has to do more on my field of expertise that is footwear design.

As my experience taught me, the best designs are emerges from creative pattern making. In this book I will give away my best tips on how to create any shoe design, from creatively approaching pattern making if you want to build entire collection or just a shoe for yourself and much more. I will probably place more updated information about the book, before launching it on the blog, so stay tune.
More than that, I finally updated my last collection, so I wanted to share this one with you as well. The concept behind it and what inspired me to create it the way it is.  


ABOUT  "REVEAL RAW" 

Feb 5, 2013

How to make Penny Loafer shoes with tassels


1) As usual paste the adhesive tape on the last and draw your Penny Loafers with tassels on the same principle as we did with  loafers  in the book(Penny Loafers Full Guide). Only at the point D (reference to the book) from the tongue to the sideline make round transition. Tassels and leather laces visually must continue this transition.

Jan 9, 2013

Learn to Make an Insole Pattern and New Full Guide for Penny Loafer Shoes


After the holidays, as always, there is a lot of unfinished business. I'm working on one shoe last, well checking if it's right, and then basing on this last I want to build another one. That is by the way what I do, I construct all my last.

 Lack of normal production of shoe lasts in Israel (as well as all other services of the footwear industry) leaves me no choice as to construct it by myself, to achieve the desired result. Just between us, to be honest, through trial and error, I learned how to make shoe lasts. But as much as difficult as it might be, it gave me the freedom to make any type of shoes that my imagination creates and that is all I want.
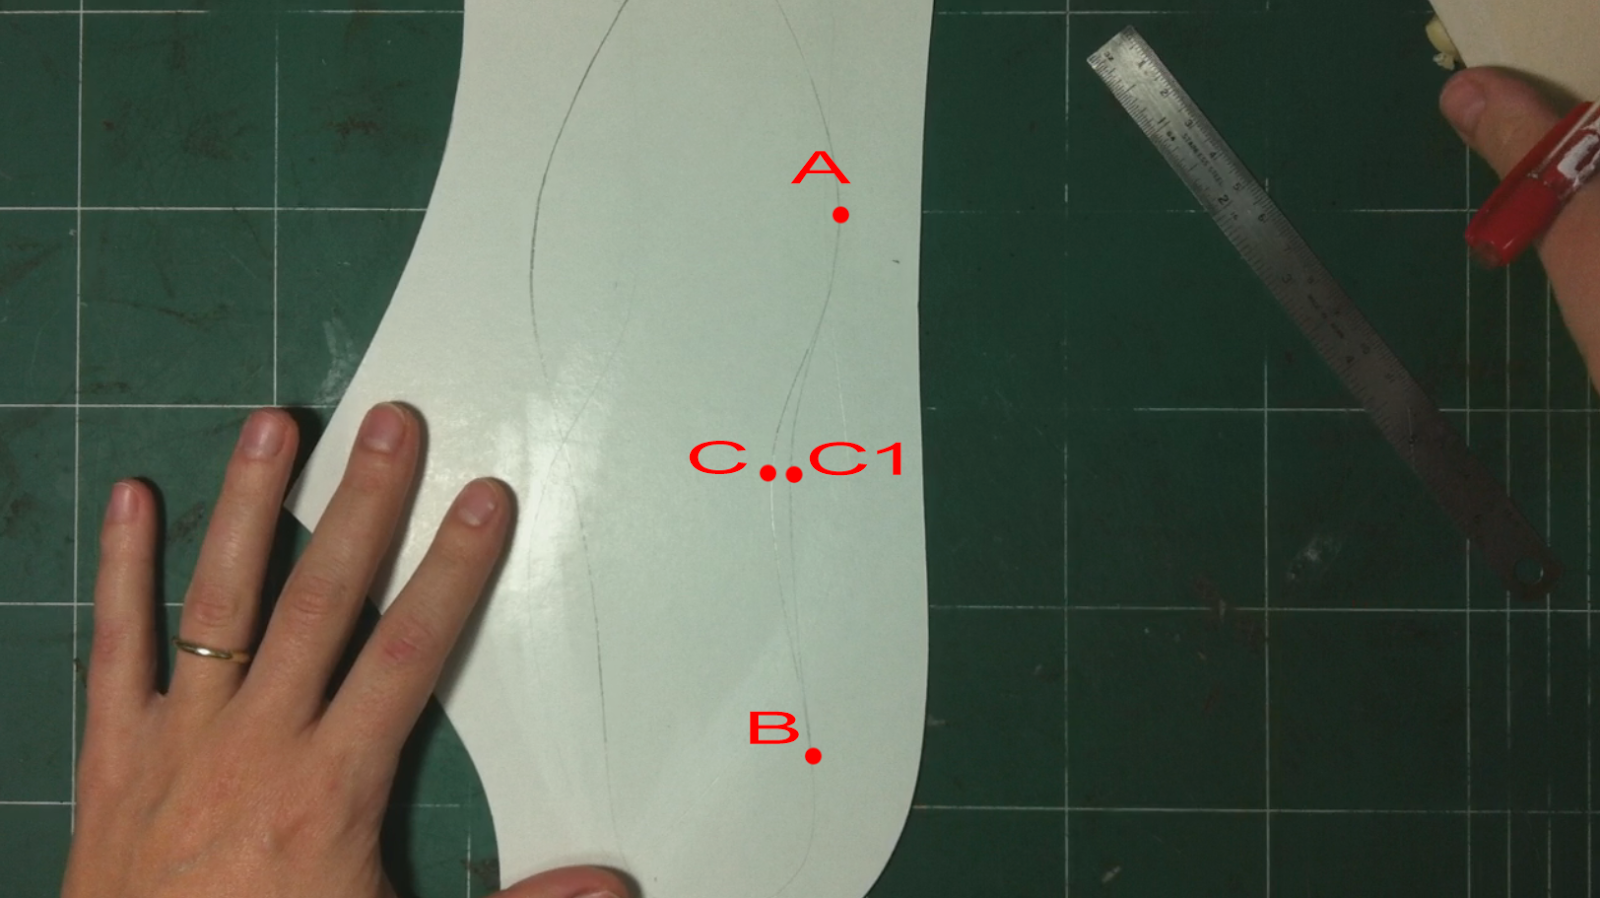
So at the same time I decided to show you how I make inside, solid insole pattern. It is based on the midsole pattern (link to video), but we need to add a small change to it:


1) On the inner side from point A to point B through C1 draw a smooth line. 


Nov 22, 2012

Single cut pattern for high heel pumps


Boat shoes model, in spite of its apparent simplicity is one of the complex shoes to make. The complexity is in precise of lines that are to be performed. It is in the crew neck, in the so-called cleavage, concentrated all the beauty of the shoes, which should emphasize the graceful curve of the foot. 


Therefore, in the construction of boats all the focus on finding beautiful deep cut on the last
. When I was in Italy, I took a course conducted by boots pattern teacher, who was nicknamed the King of boats. His name was Bruno. He was already retired, but he was still invited to all the shoe factories in the area where I went to school, to make pattern of a boat for them. This wonderful teacher showed us an interesting method for constructing single cut pattern pumps with high heels. It is quite difficult to do and requires a lot of experience. I want to show and explain to you the key point of this method. How from basic pattern, requiring dividing boat patterns on two parts (the seam on the inside of the boat), to make a single cut basic pattern.

Step by step guide "Single cut pattern  for high heel pumps"

Nov 10, 2012

Little Known Ways for Springing a Basic Pattern


Often making the correct pattern depends on how we attach it to the cardboard. It's so simple, but at the same time a critical point in the process of work on the basic pattern. But with the help of two simple cuts on patterns we can easily fix it. If we glued pattern below the desired angle, then we close it in the incision. If it turned out with a sharp angle, we will open it in the incision. To do this, you first need to find the lowest point in the pattern curve at the front of the last. It is located in the center of the intersection of a straight line drawn from the middle toe and the other a straight line drawn from the center of arc.

 From this point it is necessary to draw a straight line down and incise it to the middle. Then back down 2 mm and then  continue to the end of a cut in a straight line down. Thus, closing the incision at the top (or, opening, depending on the need), pattern angle is reduced, and opens at the bottom at the same time. The pattern is not deformed, and is easily corrected by using these two simple cuts. And you don't have to make a new pattern with a scotch tape.


Jun 6, 2012

How to make a sandal


Enter your email address:


How to make a sandal

I have not written posts and totally abandoned my blog. Perhaps those who read it before, had lost all interest in him. Anyway, I decided to continue my blog and my first post after a long inexcusable break, I dedicate to my video tutorial, where I show how you can make a sandal without special equipment, without shoe last, all by yourself. It was my dream for long time to develop this simple technique, that will allow anyone to make a sandal for themselves without living the house. I want to show you how to do this with so-called "biblical" sandal as the example, and you already can vary based on it. In this post (after you watched the video- both parts),I want to draw attention on a few important moments.

 Here is the list of things you need  to get it done.

- A4 paper
- duplex cardboard
- pencil
- eraser
-colored markers
-Stanley knife
-masking paper -punch -leather glue
-ruler
- punch
-buckle 2 cm wide
-abrasive paper
-drill
-scotch tape
-hammer
-leather for the upper& leather for insoles and soles -pin
-spoon (yes, a spoon)

Notes to the first part

1. The front of the sandal can be done in any shape: oval, square, pointed, asymmetric, etc. 2. You can use your old sandal to shape the insole . 3. Width of the straps should be the same as the width of the buckle. In my case it is 2 cm. 4. When attaching the straps, the inside (of your foot) strap should be put closer to the base of the thumb and the outer strap to your pinky. 5. Be sure to mark the inner side of each strap.

Notes to the second part

1. Marks on the inside and outside of the insole shall follow the same line, except for the front marks. 2. Add 1.5 cm to each strap (This will be the part which should be glued to the insole). Be sure to cut the mark out in order to identify their position. And then mark it on the leather. 3. The holes for the buckle should be with an interval of 7 mm-1cm. 4. To get a better and straight cut of the leather straps, tape the cardboard straps to the leather using the scotch tape. 5. You don't have to drill the insole for the straps, but it will be easier to glue the insole to the sole in the end. 6.When you put the second layer of glue on the insole and the sole, it should be left to dry for 24 hours. 7. The heel can be in any shape: oval, round, asymmetrical, square (like in my video). For those who size 37, the length should not be above 8.5 cm. 8. Important: It's better to glue the heel to the sole before gluing sole to the insole. 9. You can attach a rubber heel-piece, to prevent the heel grinding. 12. When polishing shoes and insole edges, wet it with water and grind in one direction to obtain a smooth surface. That's it for this post, feel free to write and comment if you got any question. If you got your sandal done, send me the picture, I would love to post it on my blog.
 I'll be back next week with new stuff, stay tuned. 
Sveta Kletina
Find me on Facebook
Follow me on Twitter 
My website :www.sk-shoes.com
Web Statistics