Showing posts with label Bespoke shoes. Show all posts

Mar 3, 2014

Unlock Your Creativity At Footwear Design Course


When you are working on the design of your shoes, going deep inside of your imagination, choosing the right lines, navigating your mind between the emotions, looking for inspiration, giving meaning to your design, understanding what you are doing, exploring the unexplored, ..... do you do that or is it sound little bit strange to you?

I'm not trying to make fun of this or another way to create design, but working, learning and exploring footwear design for years I could not ignore some patterns of behavior and understanding of what is footwear design .

Jan 1, 2014

6 Best Value Shoe Pattern Making Tips for 2014 that I Use Every day


Happy New Year Everybody! As I waked up early today after new year's celebrations I wanted to launch this year with very optimistic, happy start blog post to benefit all of my readers, In this post I will give away 6 best value Pattern Making Tips that I use in every shoe model that I do, and it helps me to avoid mistakes and saves my time like nothing else. But before we get to that, I want to take a minute to thank you all for the past year.

A lot happened in 2013 with this blog and this community, we definitely got bigger which is amazing in my opinion and what is more amazing and what I am personally thankful for is the support I get from you. I launched Shoemaking courses online 3 month ago, with no expectations what so ever and to see so many people joining the courses was just amazing, thank you all and I promise to keep the content in the highest level and help your growth and creativity.

Oct 23, 2013

Ballerina Shoes Course and What Else Shoemaking Platform Have to Offer

One of my favorite courses that I teach on my shoemaking courses online for beginner level is about to end soon. It came out unexpected long, because I tried to explain and to show as much details as I could, so that you can easily make your first pair of shoes. The most important thing to me was to make it clear and understandable,  all the  shoemaking process, so that  in the you will be able to make pattern, to sew, to last, and to create heels by yourself. Only one lesson separates us from complete pairs of shoes where you will learn how to finish them, how to take them of  the last and to make the insole. You can see below some sneak peeks from this course. 


Quick note:  Because many of you don't have good connection with internet and asked me about this possibility. In short a time I plan to unit all these lessons together (it is more than 10 hours long) to create a DVD or eBook of Ballerina Shoes . It will take me time, but I will do it and you will able to purchase full ballerina shoes course on my blog here.
 Another exciting process which I'm working on now is that I'm negotiating with suppliers of various materials and tools for shoemaking , so in a really short time (maybe even next week)  they will be available on www.shoemakingcoursesonline.com.  I've been working on it for some time but I could never get it done , but now with the development of my new platform it has become finely possible to do it.
My faithful members of this platform, makers, shoemakers  will benefit from this even more; they will be able to purchase instruments and materials for shoemaking with a member discounts. And now since I have accumulated a lot of work because I was sick last week, I need to get back to work.


Good luck and have a nice day!

Sveta Kletina

Follow my blog with Bloglovin

Jul 9, 2013

Day 2: How to adopt your design to Golden points by bending some rules?


Knowing the gold points is surely makes your life as designer or shoemaker much easier but knowing them, memorizing them will not solve your problem unless you making the same boot over and over again. You must know how to use this knowledge, to create your own formulas, because each design that you may have will extend the possibilities that those points gives you, and you need to know how to fix it. One thing for sure, it comes with experience and creative approach, not to mention other aspects that are influence your design, like type and correctness of the last you use, type of leather, it could be too thick, to stretched, no stretched the best advice I can give you is, learn it, use it, make it your own.

Here are couple questions and answers that emerged from the book:

  •  How to stay in the safe area (golden points) but exceed the classic last borders. (from chapter 2 , 4)

Visually divide the last into equal segments, so you will be able to work in the last proportions:

For example: Let's say I want to make asymmetric Channel shoes with geometric forms in the pattern. To do it I visually divided the last into 4 even segments, that are created by lines LM,KK1 ( middle of the last length), FC.

By creating volume in the heel( 2 segments- LM, KK1) I need to make this volume equal in other two segments KK1, CF according to the geometric forms of the pattern.


As you see, by doing this I work according to the rules of Golden points and I divide the last into proportional segments that are helping me to extend the boundaries of the last and in the same time staying in the last proportions. That's what I call bending the rules.

  •  Selectively chose the gold points that you need to work with your design 

Jul 8, 2013

Shoemaking Marathon Week: Day One


After a lot of writing and answering questions for the past week, I decided that few actions need to be done. A lot of questions regarding the "Shoemaking & Techniques for Creative Footwear Design" book evolved in areas and directions that I didn't thought of them , but it is alright and I'm here to explore the book more thoroughly.
Because, nobody wants to read this post for an hour, and because I didn't wrote everything yet, and still thinking of how to explain some of the questions that you asked me or you may ask in the future, we will do it a whole week.
Here is what we will be exploring for the next three days:


* Day one: The most asked about chapter is chapter 2, the "Golden points". So, for the day one (today) I will be doing tutorial on" How to properly construct the Boot pattern according to gold points". 


* Day two : (Hello chapter 2, again) " How to adopt your design to Golden points by bending some rules". This one is for those of you who struggle with strict rules of pattern making. When your vision of design is way different from what the golden points are, and you know that if you break them, you will have some issues with your shoes. I will show you how to fix it in more creative and professional way.

* Day three: Since the chapter 6, (How to build an entire collection just with 2 types of lasts) "made the day" for some of you and that fact made my day as well, I wanted to extend this chapter ideas and that's what we going to do on the third day, " How to transform your sandal last into platform sandal last".

This is the schedule for next three days, and the rest will be updated, you are welcome to add your own questions that you had from the book, and I will try to include them as well.

Jun 10, 2013

Design Concept: Collect, Research & Develop


How long it have been? 2 months ? I know, I know I have a lot of explaining to do and I will, but first let me just say it's good to be back, how strange it may sound it's even exciting to type this post on my keyboard, a definite change for me in this couple of months.
I thank you all who emailed me, concerning my sudden disappearing, it's a great and warm feeling to know you care and it surely gave me a lot of strength to keep up with what I was doing. The reason for my disappearing is pretty simple, work a lot of work. I can't say it was not expected, I was willing to take orders and make this collection in a bigger scale but I was not ready for this and you know you are not ready, when there is just not enough hours in a day (and night). There is a bigger story to tell what and how it happened, but I learn my lesson and I even developed new and exciting techniques to help me work faster and more efficient and I didn't forget you. So, remember the book? Design book that I was writing about, just before all this? Well, I made a few serious changes and even added more  great content for your creative minds, like the points you have know  to create correct pattern from the first time.
The book is planned to be available here on my blog on June 15, so I will keep you posted.

Mar 20, 2013

Now You Can Make Midsole By Yourself And Say Goodbye to Your Supplier


Today I decided to share with you one of my "gold" tutorials: how to do mid-sole by yourself. I mean gold in sense that it helped me a lot in the beginning of my way as an independent shoe designer.  As it usually happens at the beginning ,no suppliers want to work with you, because you don't order big quantities. So to make my dream come true (make  my own shoes) I had to come up with a technique of manufacturing mid-soles in home, by myself, as they call it DIY.

Mar 12, 2013

Why is it important to know how to make the classic model of shoes?


When I studied at the Art Academy in Jerusalem, I was very fond of classical drawing lessons, because I understood that in the future  for  me to be able to draw any of  my fantasy figure, I must first learn the basics. So, in whatever  you touch upon, in any field, you must first learn the basics of the subject, in which you would like to achieve perfection. At the shoe craftsmanship such a basis, in my opinion, is the study of all the classic shoe models based on which you can make any shoe.

So to be a designer that is not only "creates" and by that I mean "makes a pretty drawing on a paper", but also can really make any of his ideas, it is important to know the construction of the classic shoe models. While I personally have never made any classic model of shoes (in a his "clean definition") in my own collections
, I have all my models designed only because my knowledge on how to structure classic models of shoes. Those  models as they are, in terms of design, don't interest me, but the knowledge of their design gives me the freedom to create. They, like the alphabet, for those who wish to be a writer.


Jan 9, 2013

Learn to Make an Insole Pattern and New Full Guide for Penny Loafer Shoes


After the holidays, as always, there is a lot of unfinished business. I'm working on one shoe last, well checking if it's right, and then basing on this last I want to build another one. That is by the way what I do, I construct all my last.

 Lack of normal production of shoe lasts in Israel (as well as all other services of the footwear industry) leaves me no choice as to construct it by myself, to achieve the desired result. Just between us, to be honest, through trial and error, I learned how to make shoe lasts. But as much as difficult as it might be, it gave me the freedom to make any type of shoes that my imagination creates and that is all I want.
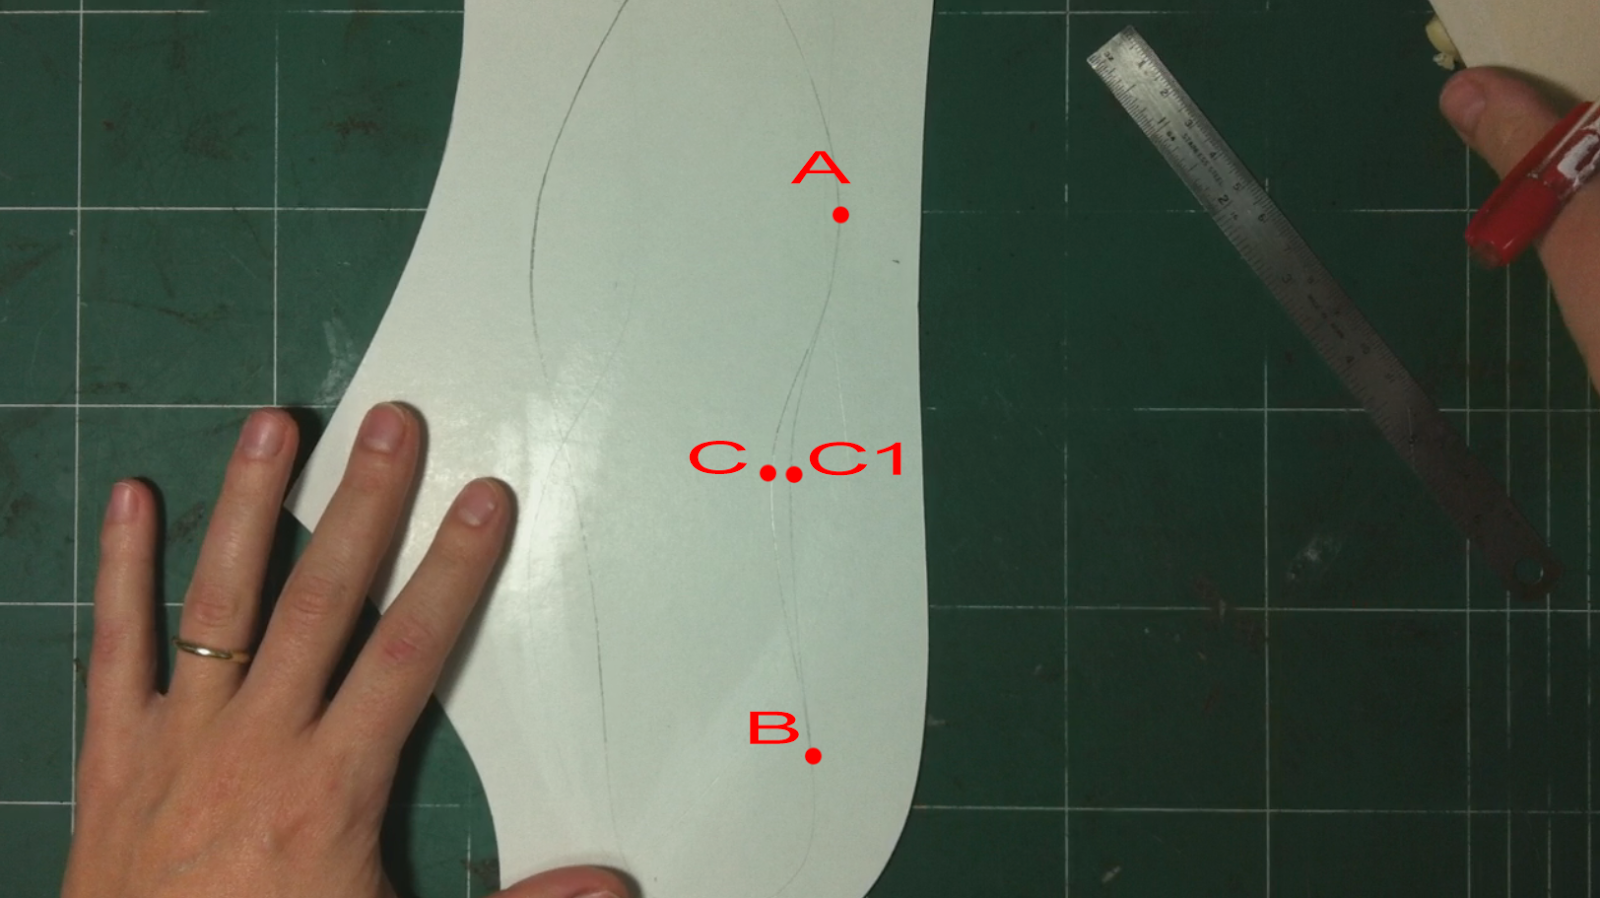
So at the same time I decided to show you how I make inside, solid insole pattern. It is based on the midsole pattern (link to video), but we need to add a small change to it:


1) On the inner side from point A to point B through C1 draw a smooth line. 


Nov 22, 2012

Single cut pattern for high heel pumps


Boat shoes model, in spite of its apparent simplicity is one of the complex shoes to make. The complexity is in precise of lines that are to be performed. It is in the crew neck, in the so-called cleavage, concentrated all the beauty of the shoes, which should emphasize the graceful curve of the foot. 


Therefore, in the construction of boats all the focus on finding beautiful deep cut on the last
. When I was in Italy, I took a course conducted by boots pattern teacher, who was nicknamed the King of boats. His name was Bruno. He was already retired, but he was still invited to all the shoe factories in the area where I went to school, to make pattern of a boat for them. This wonderful teacher showed us an interesting method for constructing single cut pattern pumps with high heels. It is quite difficult to do and requires a lot of experience. I want to show and explain to you the key point of this method. How from basic pattern, requiring dividing boat patterns on two parts (the seam on the inside of the boat), to make a single cut basic pattern.

Step by step guide "Single cut pattern  for high heel pumps"

Nov 10, 2012

Little Known Ways for Springing a Basic Pattern


Often making the correct pattern depends on how we attach it to the cardboard. It's so simple, but at the same time a critical point in the process of work on the basic pattern. But with the help of two simple cuts on patterns we can easily fix it. If we glued pattern below the desired angle, then we close it in the incision. If it turned out with a sharp angle, we will open it in the incision. To do this, you first need to find the lowest point in the pattern curve at the front of the last. It is located in the center of the intersection of a straight line drawn from the middle toe and the other a straight line drawn from the center of arc.

 From this point it is necessary to draw a straight line down and incise it to the middle. Then back down 2 mm and then  continue to the end of a cut in a straight line down. Thus, closing the incision at the top (or, opening, depending on the need), pattern angle is reduced, and opens at the bottom at the same time. The pattern is not deformed, and is easily corrected by using these two simple cuts. And you don't have to make a new pattern with a scotch tape.


Oct 16, 2012

Cristian Loubutin Symmetrical Line folds


I am still working on a new 2013 collection,  having fun working with leather. I like its structure, its plasticity and even the smell. I especially like the moment when, fresh made shoes, are ready to go to their future owner, loudly tapping on my desk. I have one of them drying on my desk right now.      In the process

Web Statistics